

When it comes to our High-Performance Computing (HPC) systems, efficiency is the name of the game. But are you managing your Python environments efficiently?
Our HPC systems use network file systems that are optimized to access a small number of large files. This is particularly true for the parallel file systems that are used for the /scratch directories (which uses the Lustre file system). Using a typical Python environment with many thousands of small files creates overhead for the file system and can slow down the loading time of your program significantly, as well as slowing down the file system for all other users of the cluster.
In this article we learn how to put the Python environment inside a single container file instead, which greatly reduces the overhead on the file system. The used container definition files can also easily be tracked with version management to satisfy the requirements of scientific data management, similar to the source code you write.
A more permanent version to this article with updates and fixes can be found at https://gitlab-ce.gwdg.de/hpc-team-public/science-domains-blog/-/blob/main/20230907_python-apptainer.md
Sign up for NHR@Göttingen
If you don’t have access yet you can create an NHR account at https://zulassung.hlrn.de/. This is free for all researchers associated with german universities. Is this your first time on any cluster? Check out our bonus material on cluster concepts.
Apptainer on the Emmy & Grete systems
You can load the apptainer module on the login servers glogin[0-9]
module load apptainer
You can run apptainer build commands on the login nodes to create your container files, and submit a slurm job that uses apptainer run to run them on the compute nodes. It is currently not possible to run them directly on the login nodes. Note that for testing the test queues as well as interactive sessions can be used to prevent waiting for your job to start only to figure out later that you forgot a semicolon in your code.
To use the container you have to submit a slurm job to run them on one of the compute nodes.
I want to test it on my own system
You can also install apptainer on your local linux computer or virtual machine (VM). You can find the latest releases on https://github.com/apptainer/apptainer/releases/ If you don’t use Linux on your computer, you can also create a Virtual Machine (VM) with a Linux installation to test on (for example by using VirtualBox, VMWare Fusion or Parallels Desktop).
On Ubuntu 22.04 LTS Desktop the following should be sufficient to install version 1.2.2 (which might be outdated by the time you are reading this):
sudo nala install fuse-overlayfs
wget https://github.com/apptainer/apptainer/releases/download/v1.2.2/apptainer_1.2.2_amd64.deb
dpkg -i apptainer_1.2.2_amd64.deb
Note: nala is a more powerful and intuitive replacement for apt. If you don’t use nala yet you can install it with sudo apt install nala or use the old apt install instead of nala install. Check out nala history in particular!
Can I run it on the GWDG Scientific Compute Cluster (SCC)?
We currently do not support building your own containers on SCC. If you bring your own container image container.sif though (for example created on your own system, see previous section), you can run it:
module load singularity
singularity run container.sif
General workflow
When working with apptainer, there are usually three steps involved:
- Writing a container definition file (.def) (or recipe)
- Using
apptainer buildto create a container image file (.sif) ( or baking the recipe) - Using
apptainer runto run the container (if we continue with the metaphor, getting scientific results is like eating a cake)
It is not necessary to do all of the steps on the same computer or even by the same person: you can exchange recipes with your colleagues, and also make container image files you created available for download.
In this tutorial we will exemplify the process by providing you recipes that you can build & run on our Emmy & Grete clusters.
Editing text files on the cluster
Please keep in mind that you don’t have to use terminal text editors like vim and emacs but can use the graphical text editor you might already be familiar with if you use an SFTP/SCP client like FileZilla, CyberDuck or Transmit or a text-editor with a built-in client. You need to provide the same hostname, username and SSH key as when logging in via the terminal. The details depend on your operating system and SFTP/SCP client and might be more difficult for Windows users.
On Linux your file browser probably already supports SFTP/SCP without having to install anything. (If you use Gnome and you have setup the $HOME/.ssh/config on your computer so that e.g. you only have to type ssh glogin-gpu to connect to Grete, just enter ssh://glogin-gpu in Files > + Other Locations > Connect To Server.)
Miniconda container: Physics Example
Don’t worry, you will not need any physics knowledge to run this example.
We want to install Quspin (https://quspin.github.io/QuSpin/) in a container to simulate a many-body quantum system. Create the following Apptainer Definition File:
quspin.def
Bootstrap: docker
From: continuumio/miniconda3
%post
    conda update -y conda
    conda install -y python=3.10
    conda install -y -c weinbe58 omp quspin
If we build this file, the official miniconda3 container will be fetched from https://hub.docker.com/r/continuumio/miniconda3 and the commands in the %post section will be run to install the quspin module before creating a single Singularity Image Format file (SIF). If you read this article in the far future, you might have to re-adjust the Python version from 3.10 to one that is currently supported by quspin.
$ apptainer build quspin.sif quspin.def
The creation of the SIF file can take a few minutes.
We can now fetch an example from the QuSpin project and try out our new container (we use srun here to start a slurm job on the Emmy cluster):
$ wget https://quspin.github.io/QuSpin/downloads/be9497383fff21e4d03309a4d1a24ce1/example5.py
$ srun -p medium40:test ./quspin.sif python example5.py
srun: job 4813650 queued and waiting for resources
srun: job 4813650 has been allocated resources
Hermiticity check passed!
Symmetry checks passed!
Particle conservation check passed!
$
Note: If you are reading this in the future and the examples have changed, feel free to substitute a different example script from the QuSpin website.
Congratulations! You might have just simulated your first many-body quantum system! Feel free to explore the other quspin examples and simulate your favourite many-body quantum system.
Instead of explicitly executing the .sif file as an executable, you can also use the apptainer run command:
srun -p medium40:test apptainer run quspin.sif python example5.py NOTE: By default your home directory on the cluster $HOME is mounted inside the container at the same location. If you need other directories — in particular $WORK and $TMPDIR — to be available inside the container, add e.g. --bind $WORK,$TMPDIR to your apptainer run command:
apptainer run --bind $WORK,$TMPDIR quspin.sif python example5.py
Otherwise the files in your $WORK and $TMPDIR directories on Emmy/Grete will not be visible inside the container, since they are not subdirectories of $HOME.
NOTE: If you have installed Python modules directly into your $HOME with pip, this might cause all sorts of problems (not just with apptainer but also conda and venv environments) and you might consider running the apptainer with –no-home and –bind only the directories you need explicitly.
You can check if you have those modules contaminating your container/environment by running python -m pip list --user inside the container/environment and if you are sure you don’t need them, remove them with python -m pip uninstall <pkgname>.
Running the quspin example on your own machine
You will not be using the slurm resource manager if you are following the examples on your own machine. In that case you can execute the container directly:
./quspin.sif python example5.py
The other commands used were running directly on the login node and should also work on your computer.
Python container with pip: Deep Learning Example
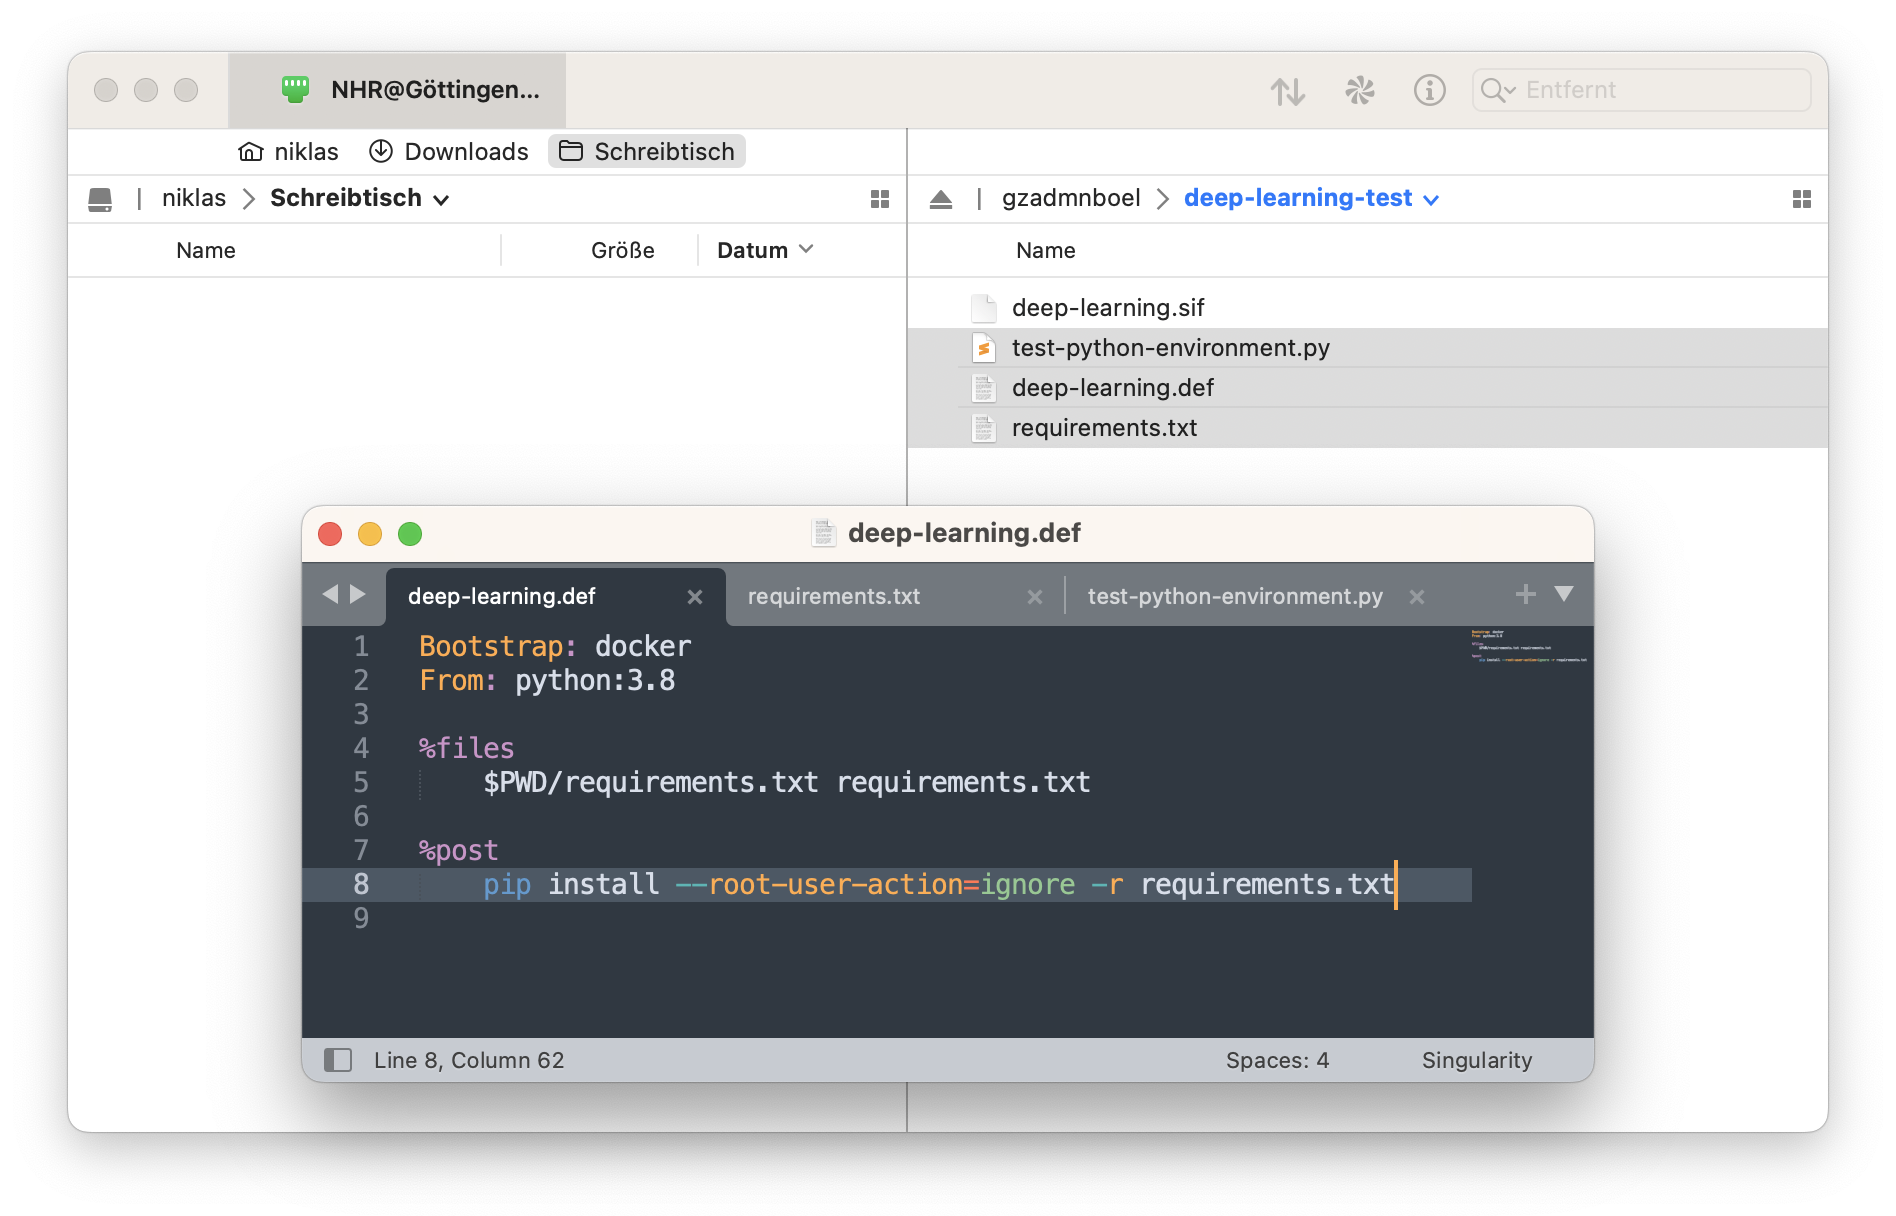
In this example we will move the Python environment that is used for the A Beginner’s Guide to Deep Learning with GPUs on Grete at https://info.gwdg.de/news/a-beginners-guide-to-deep-learning-with-gpus-on-grete/ into a container. Since pip is used to install the modules, we can use the official Python container and do not have to mix pip with conda (which can break your environments if you are not careful). Also it is always good to be less reliant on commercial software like Anaconda. We just need the Apptainer Definition File (.def) and a file with the modules we want pip to install which we will call requirements.txt.
In this case we take the requirements.txt from the Course gitlab repository: https://gitlab-ce.gwdg.de/dmuelle3/deep-learning-with-gpu-cores/-/blob/main/code/requirements.txt. Note that we use Python version 3.8 to match what is used in the course. You can check out what other versions are currently available at https://hub.docker.com/_/python.
deep-learning.def
Bootstrap: docker
From: python:3.8

%files
    $PWD/requirements.txt requirements.txt

%post
    pip install --root-user-action=ignore -r requirements.txt
We run the following commands:
wget https://gitlab-ce.gwdg.de/dmuelle3/deep-learning-with-gpu-cores/-/raw/main/code/requirements.txt
apptainer build --nv deep-learing.sif deep-learning.def
We can now test our container on the Grete cluster. We will use a simple test script:
test-python-environment.py
import torch
import torch.nn as nn
import torch.optim as optim
torch.utils.collect_env
import sklearn

print(sklearn.show_versions())

print(torch.__config__.show())

print(torch.utils.collect_env.get_pretty_env_info())

if torch.cuda.is_available() and torch.cuda.device_count() > 0:
	print("Active CUDA device:",
          torch.cuda.get_device_name(torch.cuda.current_device()))
else:
        print("No active CUDA devices.")
We start an interactive job on a grete compute node:
$ salloc -t 01:00:00 -p grete:interactive -N1 -G V100:1
And then run the test script:
$ module load apptainer
$ apptainer run --bind $WORK,$TMPDIR --nv deep-learning.sif python test-python-environment.py
$ exit
NOTE: To get NVIDIA CUDA support the --nv option to the apptainer run is required. On AMD ROCm platforms this would instead be replaced by --rocm.
Example output on Grete (shortened)
login9:~/deep-learning-test $ salloc -t 01:00:00 -p grete:interactive -N1 -G V100:1
[... snip ...]
salloc: Nodes ggpu02 are ready for job
ggpu02:~/deep-learning-test $ module load apptainer
ggpu02:~/deep-learning-test $ apptainer run --bind $WORK,$TMPDIR --nv deep-learning.sif python test-python-environment.py
[... snip ...]
Versions of relevant libraries:
[pip3] numpy==1.24.2
[pip3] torch==2.0.0
[pip3] torchvision==0.15.1
[conda] Could not collect
Active CUDA device: Tesla V100S-PCIE-32GB
ggpu02:~/deep-learning-test $ exit
exit
salloc: Relinquishing job allocation 4812554
salloc: Job allocation 4812554 has been revoked.
glogin9:~/deep-learning-test $
Similarly the submit scripts from the course can be changed to use apptainer instead of anaconda3. For example, if we put the container file at $WORK/deep-learning.sif, the code in submit_train.sh could look like this:
# SBATCH ...
module load apptainer
apptainer run --nv --bind /scratch $WORK/deep-learning.sif python train.py
Here we have bound the entire /scratch directory so we have access to $WORK, $TMPDIR and also the data folder in /scratch/projects/workshops/gpu-workshop from inside the container.
To get the debug output that was previously provided by python -m torch.utils.collect_env in the submit script, you can for example add the following line to the if __name__ == "__main__": block in train.py
print(torch.utils.collect_env.get_pretty_env_info())
A more advanced usage would be to create a shell script that is executed inside the container (apptainer run ... run_train.sh) that allows you to run e.g. multiple Python commands and emit extra debugging information about the container.
Running the deep learning example on your own machine
You will not be using the slurm resource manager if you are following the examples on your own machine. In that case you can execute the container directly:
apptainer run --nv deep-learning.sif python test-python-environment.py
If you don’t have a CUDA Stack you can also leave out the –nv flag. You should still see some output from PyTorch, even though the “Active CUDA device: …” will be missing.
The other commands used were running directly on the login node and should also work on your computer.
Using a sandbox
While you are testing how to best build your container, you can skip the creation of the .sif file and instead create a directory that contains all the individual files inside the container. If we change the earlier QuSpin example:
apptainer build --sandbox quspin quspin.def
You can now run commands inside the container (for a sandbox this will also work on the login nodes of NHR@Göttingen!)
apptainer shell quspin
You can even make changes (for example to install software with apt, yum or pip) to the container if you use the following command:
apptainer shell --writable quspin
If you are satisfied with the container you should add all the necessary commands to the .def file and build a .sif file for use on the cluster as shown in the previous sections, since the sandbox has all the same disadvantages for the file system that Python environments have.
Other containers
A few other interesting containers to start from are miniforge3 from conda-forge with access to the large community driven package repository and NVIDIA CUDA with the latest version of the NVIDIA CUDA Deep Neural Network library. Please be careful about only using containers from reputable sources!
I wish you a fun and educational time with apptainer!
Author
Niklas Bölter
https://gitlab-ce.gwdg.de/hpc-team-public/science-domains-blog/-/blob/main/20230907_python-apptainer.md
CUDA is a registered trademark of NVIDIA Corporation ROCm is a registered trademark of Advanced Micro Devices, Inc
Appendix: Example output on Grete (full, Click to expand)
login9:~/deep-learning-test $ salloc -t 01:00:00 -p grete:interactive -N1 -G V100:1
salloc: Pending job allocation 4812554
salloc: job 4812554 queued and waiting for resources
salloc: job 4812554 has been allocated resources
salloc: Granted job allocation 4812554
salloc: Waiting for resource configuration
salloc: Nodes ggpu02 are ready for job
ggpu02:~/deep-learning-test $ module load apptainer
ggpu02:~/deep-learning-test $ apptainer run –bind $WORK,$TMPDIR –nv deep-learning.sif python test-python-environment.py
INFO: fuse: warning: library too old, some operations may not work
INFO: underlay of /usr/bin/nvidia-smi required more than 50 (517) bind mounts
System:
python: 3.8.17 (default, Jul 28 2023, 06:03:56) [GCC 12.2.0]
executable: /usr/local/bin/python
machine: Linux-4.18.0-425.19.2.el8_7.x86_64-x86_64-with-glibc2.34
Python dependencies:
sklearn: 1.2.2
pip: 23.0.1
setuptools: 65.6.3
numpy: 1.24.2
scipy: 1.10.1
Cython: None
pandas: 1.5.3
matplotlib: 3.7.1
joblib: 1.2.0
threadpoolctl: 3.1.0
Built with OpenMP: True
threadpoolctl info:
user_api: openmp
internal_api: openmp
prefix: libgomp
filepath: /usr/local/lib/python3.8/site-packages/torch/lib/libgomp-a34b3233.so.1
version: None
num_threads: 1
user_api: blas
internal_api: openblas
prefix: libopenblas
filepath: /usr/local/lib/python3.8/site-packages/numpy.libs/libopenblas64_p-r0-15028c96.3.21.so
version: 0.3.21
threading_layer: pthreads
architecture: SkylakeX
num_threads: 1
user_api: openmp
internal_api: openmp
prefix: libgomp
filepath: /usr/local/lib/python3.8/site-packages/scikit_learn.libs/libgomp-a34b3233.so.1.0.0
version: None
num_threads: 1
user_api: blas
internal_api: openblas
prefix: libopenblas
filepath: /usr/local/lib/python3.8/site-packages/scipy.libs/libopenblasp-r0-41284840.3.18.so
version: 0.3.18
threading_layer: pthreads
architecture: SkylakeX
num_threads: 1
None
PyTorch built with:
– GCC 9.3
– C++ Version: 201703
– Intel(R) oneAPI Math Kernel Library Version 2022.2-Product Build 20220804 for Intel(R) 64 architecture applications
– Intel(R) MKL-DNN v2.7.3 (Git Hash 6dbeffbae1f23cbbeae17adb7b5b13f1f37c080e)
– OpenMP 201511 (a.k.a. OpenMP 4.5)
– LAPACK is enabled (usually provided by MKL)
– NNPACK is enabled
– CPU capability usage: AVX2
– CUDA Runtime 11.7
– NVCC architecture flags: -gencode;arch=compute_37,code=sm_37;-gencode;arch=compute_50,code=sm_50;-gencode;arch=compute_60,code=sm_60;-gencode;arch=compute_70,code=sm_70;-gencode;arch=compute_75,code=sm_75;-gencode;arch=compute_80,code=sm_80;-gencode;arch=compute_86,code=sm_86
– CuDNN 8.5
– Magma 2.6.1
– Build settings: BLAS_INFO=mkl, BUILD_TYPE=Release, CUDA_VERSION=11.7, CUDNN_VERSION=8.5.0, CXX_COMPILER=/opt/rh/devtoolset-9/root/usr/bin/c++, CXX_FLAGS= -D_GLIBCXX_USE_CXX11_ABI=0 -fabi-version=11 -Wno-deprecated -fvisibility-inlines-hidden -DUSE_PTHREADPOOL -DNDEBUG -DUSE_KINETO -DLIBKINETO_NOROCTRACER -DUSE_FBGEMM -DUSE_QNNPACK -DUSE_PYTORCH_QNNPACK -DUSE_XNNPACK -DSYMBOLICATE_MOBILE_DEBUG_HANDLE -O2 -fPIC -Wall -Wextra -Werror=return-type -Werror=non-virtual-dtor -Werror=bool-operation -Wnarrowing -Wno-missing-field-initializers -Wno-type-limits -Wno-array-bounds -Wno-unknown-pragmas -Wunused-local-typedefs -Wno-unused-parameter -Wno-unused-function -Wno-unused-result -Wno-strict-overflow -Wno-strict-aliasing -Wno-error=deprecated-declarations -Wno-stringop-overflow -Wno-psabi -Wno-error=pedantic -Wno-error=redundant-decls -Wno-error=old-style-cast -fdiagnostics-color=always -faligned-new -Wno-unused-but-set-variable -Wno-maybe-uninitialized -fno-math-errno -fno-trapping-math -Werror=format -Werror=cast-function-type -Wno-stringop-overflow, LAPACK_INFO=mkl, PERF_WITH_AVX=1, PERF_WITH_AVX2=1, PERF_WITH_AVX512=1, TORCH_DISABLE_GPU_ASSERTS=ON, TORCH_VERSION=2.0.0, USE_CUDA=ON, USE_CUDNN=ON, USE_EXCEPTION_PTR=1, USE_GFLAGS=OFF, USE_GLOG=OFF, USE_MKL=ON, USE_MKLDNN=ON, USE_MPI=OFF, USE_NCCL=1, USE_NNPACK=ON, USE_OPENMP=ON, USE_ROCM=OFF,
PyTorch version: 2.0.0+cu117
Is debug build: False
CUDA used to build PyTorch: 11.7
ROCM used to build PyTorch: N/A
OS: Debian GNU/Linux 12 (bookworm) (x86_64)
GCC version: (Debian 12.2.0-14) 12.2.0
Clang version: Could not collect
CMake version: version 3.26.1
Libc version: glibc-2.36
Python version: 3.8.17 (default, Jul 28 2023, 06:03:56) [GCC 12.2.0] (64-bit runtime)
Python platform: Linux-4.18.0-425.19.2.el8_7.x86_64-x86_64-with-glibc2.34
Is CUDA available: True
CUDA runtime version: Could not collect
CUDA_MODULE_LOADING set to: LAZY
GPU models and configuration: GPU 0: Tesla V100S-PCIE-32GB
Nvidia driver version: 530.30.02
cuDNN version: Could not collect
HIP runtime version: N/A
MIOpen runtime version: N/A
Is XNNPACK available: True
CPU:
Architecture: x86_64
CPU op-mode(s): 32-bit, 64-bit
Address sizes: 46 bits physical, 48 bits virtual
Byte Order: Little Endian
CPU(s): 80
On-line CPU(s) list: 0-79
Vendor ID: GenuineIntel
Model name: Intel(R) Xeon(R) Gold 6248 CPU @ 2.50GHz
CPU family: 6
Model: 85
Thread(s) per core: 2
Core(s) per socket: 20
Socket(s): 2
Stepping: 7
CPU(s) scaling MHz: 38%
CPU max MHz: 3900.0000
CPU min MHz: 1000.0000
BogoMIPS: 5000.00
Flags: fpu vme de pse tsc msr pae mce cx8 apic sep mtrr pge mca cmov pat pse36 clflush dts acpi mmx fxsr sse sse2 ss ht tm pbe syscall nx pdpe1gb rdtscp lm constant_tsc art arch_perfmon pebs bts rep_good nopl xtopology nonstop_tsc cpuid aperfmperf pni pclmulqdq dtes64 monitor ds_cpl smx est tm2 ssse3 sdbg fma cx16 xtpr pdcm pcid dca sse4_1 sse4_2 x2apic movbe popcnt tsc_deadline_timer aes xsave avx f16c rdrand lahf_lm abm 3dnowprefetch cpuid_fault epb cat_l3 cdp_l3 invpcid_single intel_ppin ssbd mba ibrs ibpb stibp ibrs_enhanced fsgsbase tsc_adjust bmi1 avx2 smep bmi2 erms invpcid cqm mpx rdt_a avx512f avx512dq rdseed adx smap clflushopt clwb intel_pt avx512cd avx512bw avx512vl xsaveopt xsavec xgetbv1 xsaves cqm_llc cqm_occup_llc cqm_mbm_total cqm_mbm_local dtherm ida arat pln pts pku ospke avx512_vnni md_clear flush_l1d arch_capabilities
L1d cache: 1.3 MiB (40 instances)
L1i cache: 1.3 MiB (40 instances)
L2 cache: 40 MiB (40 instances)
L3 cache: 55 MiB (2 instances)
NUMA node(s): 2
NUMA node0 CPU(s): 0-19,40-59
NUMA node1 CPU(s): 20-39,60-79
Vulnerability Itlb multihit: KVM: Mitigation: VMX unsupported
Vulnerability L1tf: Not affected
Vulnerability Mds: Not affected
Vulnerability Meltdown: Not affected
Vulnerability Mmio stale data: Mitigation; Clear CPU buffers; SMT vulnerable
Vulnerability Retbleed: Mitigation; Enhanced IBRS
Vulnerability Spec store bypass: Mitigation; Speculative Store Bypass disabled via prctl
Vulnerability Spectre v1: Mitigation; usercopy/swapgs barriers and __user pointer sanitization
Vulnerability Spectre v2: Mitigation; Enhanced IBRS, IBPB conditional, RSB filling, PBRSB-eIBRS SW sequence
Vulnerability Srbds: Not affected
Vulnerability Tsx async abort: Mitigation; TSX disabled
Versions of relevant libraries:
[pip3] numpy==1.24.2
[pip3] torch==2.0.0
[pip3] torchvision==0.15.1
[conda] Could not collect
Active CUDA device: Tesla V100S-PCIE-32GB
ggpu02:~/deep-learning-test $ exit
exit
salloc: Relinquishing job allocation 4812554
salloc: Job allocation 4812554 has been revoked.
glogin9:~/deep-learning-test $