

Author: Dorothea Sommer
Introduction
Switching from executing code locally to running it on a compute cluster can be a daunting and sometimes also confusing experience. This article provides a brief overview of fundamental concepts to efficiently run code on the cluster. It is not a step-by-step guide on how to set up a particular environment or run a specific software. Rather, it gives an introductory explanation about concepts and ideas to keep in mind while using the cluster, particularly if you have little to no prior experience.
Find also information regarding this article here.
Overview
- General Workflow
- Hardware Components
- Requesting Hardware via Slurm
- Cluster Connections
- Using Environment Variables in Slurm
General Workflow
We will start with a simplified cluster concept and add details when they become relevant. For now, a cluster consists of some computing units (called nodes) that are connected to each other. There are some nodes reserved for login (green in Figure 1) and some reserved for the actual computations (blue in Figure 1).

Once you logged into a frontend node (1), do not directly execute code that you would like to run. (If some users run heavy computations on the frontend nodes, other users will have problems to login in!). Instead, there is a scheduler installed on the cluster. This is a programme that coordinates who gets to calculate when on which nodes. The scheduler on the scientific compute cluster is called Slurm. Thus, to run code, you prepare a Slurm script (2). It includes both which programme you would like to run and which computing resources (hardware) you need. Such a script is called a job script. It is taken by the Slurm controller and, after some waiting (3) you get the requested resources and your code is executed automatically. All nodes have access to a shared file system, here called shared scratch. You can save the output of your computations in this file system. As for many users, the most unintuitive part of this workflow is to understand which hardware resources they need, we will cover this topic next.
TAKEAWAY: Please schedule your programme as a Slurm job instead of blocking the frontend with heavy computations.
Hardware Components
So, which resources should you request? This depends on your computation, so for instance whether the code uses multithreading or multiprocessing. We have a brief overview of the available hardware. However, to understand how software components map to the hardware and then decide which you need, let us start with the an amazing hardware-software overview, which is adapted from Smilei in Figure 2
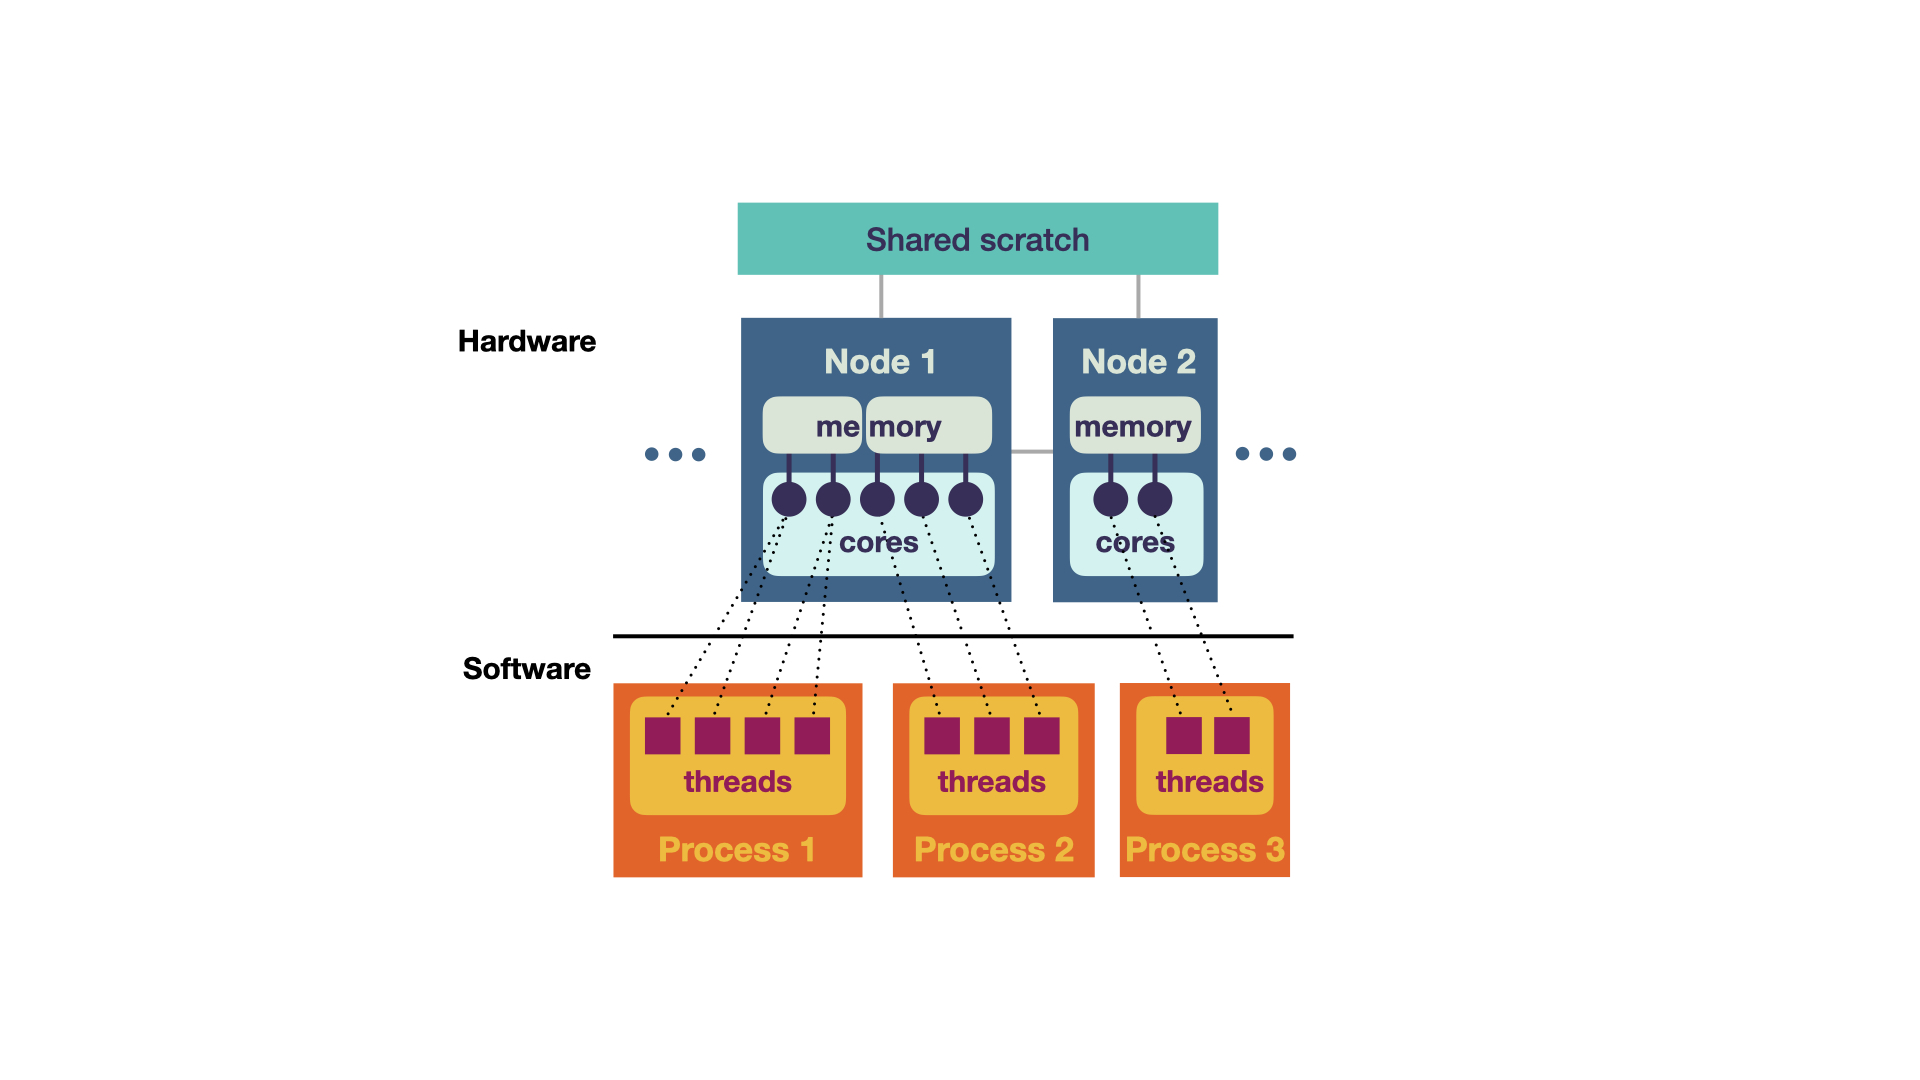
The software (bottom in Figure 2) consists of processes and threads (i.e., lines of execution). It can be mapped to hardware components (top), which are the physical elements of the cluster. The hardware elements consist of:
- Shared Scratch All nodes share the same file system. This is similar to your hard drive on the computer. Files (such as images) that are needed in subsequent computations are stored here. All nodes (and thus all programs) have access to this storage.
- Node A node is a computing unit. Inuitively, you can think of a node being similar to your computer. It has RAM, multiple cores and can run multiple programs. As depicted, the nodes can differ with respect to these components (such as having more or less cores).
- Cores Cores are processing units, such as CPU or GPU. Each node can a have different number of cores.
- Memory (RAM) Each node has its own (temporary) random-access memory (RAM). This is memory used for temporary computations such remembering numbers in a computation. The RAM is not shared between nodes and also not shared between processes. However, multiple cores can share the same RAM.
These hardware components can be mapped to the software components. Most importantly, each process (so each of your programmes) is assigned to one node. These processes might have multiple threads, so different lines of execution are run in parallel multithreading. For instance, in Monte Carlo simulations, you could run multiple simulations at once (in multiple threads) and then collect all your results in one thread at the end. Most importantly, these threads share the same memory. Two or more threads can also share the same core. This can be useful if one thread has not much to do while the others are active (such as collecting the results of the simulation at the end). In contrast to this multithreading, you can also run multiple processes that communicate with each other (multiprocessing). They can be either on the same node or even on different nodes! However, they do not share the same RAM, so this has to be accounted for in their communication.
TAKEAWAY: Think of the hardware your programme needs (in terms of running one process, multithreading or multiprocessing), e.g. how many cores this maps to.
Requesting Hardware via Slurm
In this part, we will link the more abstract hardware view to practically requesting resources. First of all, the more resources you request, the longer you need to wait for them. Even if your code execution might be fastest on a ton of resources, there is a sweet spot between balancing the waiting time (for the resources) and the actual execution time of your code. Moreover, to keep the waiting time to a minimum, it is also important that you correctly estimate what your programme will need, with respect to time and hardware.
The resources are assigned to each job by the Slurm scheduler. To do so, a script is submitted to it via sbatch personal-slurm-script.sh. Each Slurm script consists of the following parts:
- requesting resources hardware and compute time
- environment setup such as loading modules, setting environment variables
- code
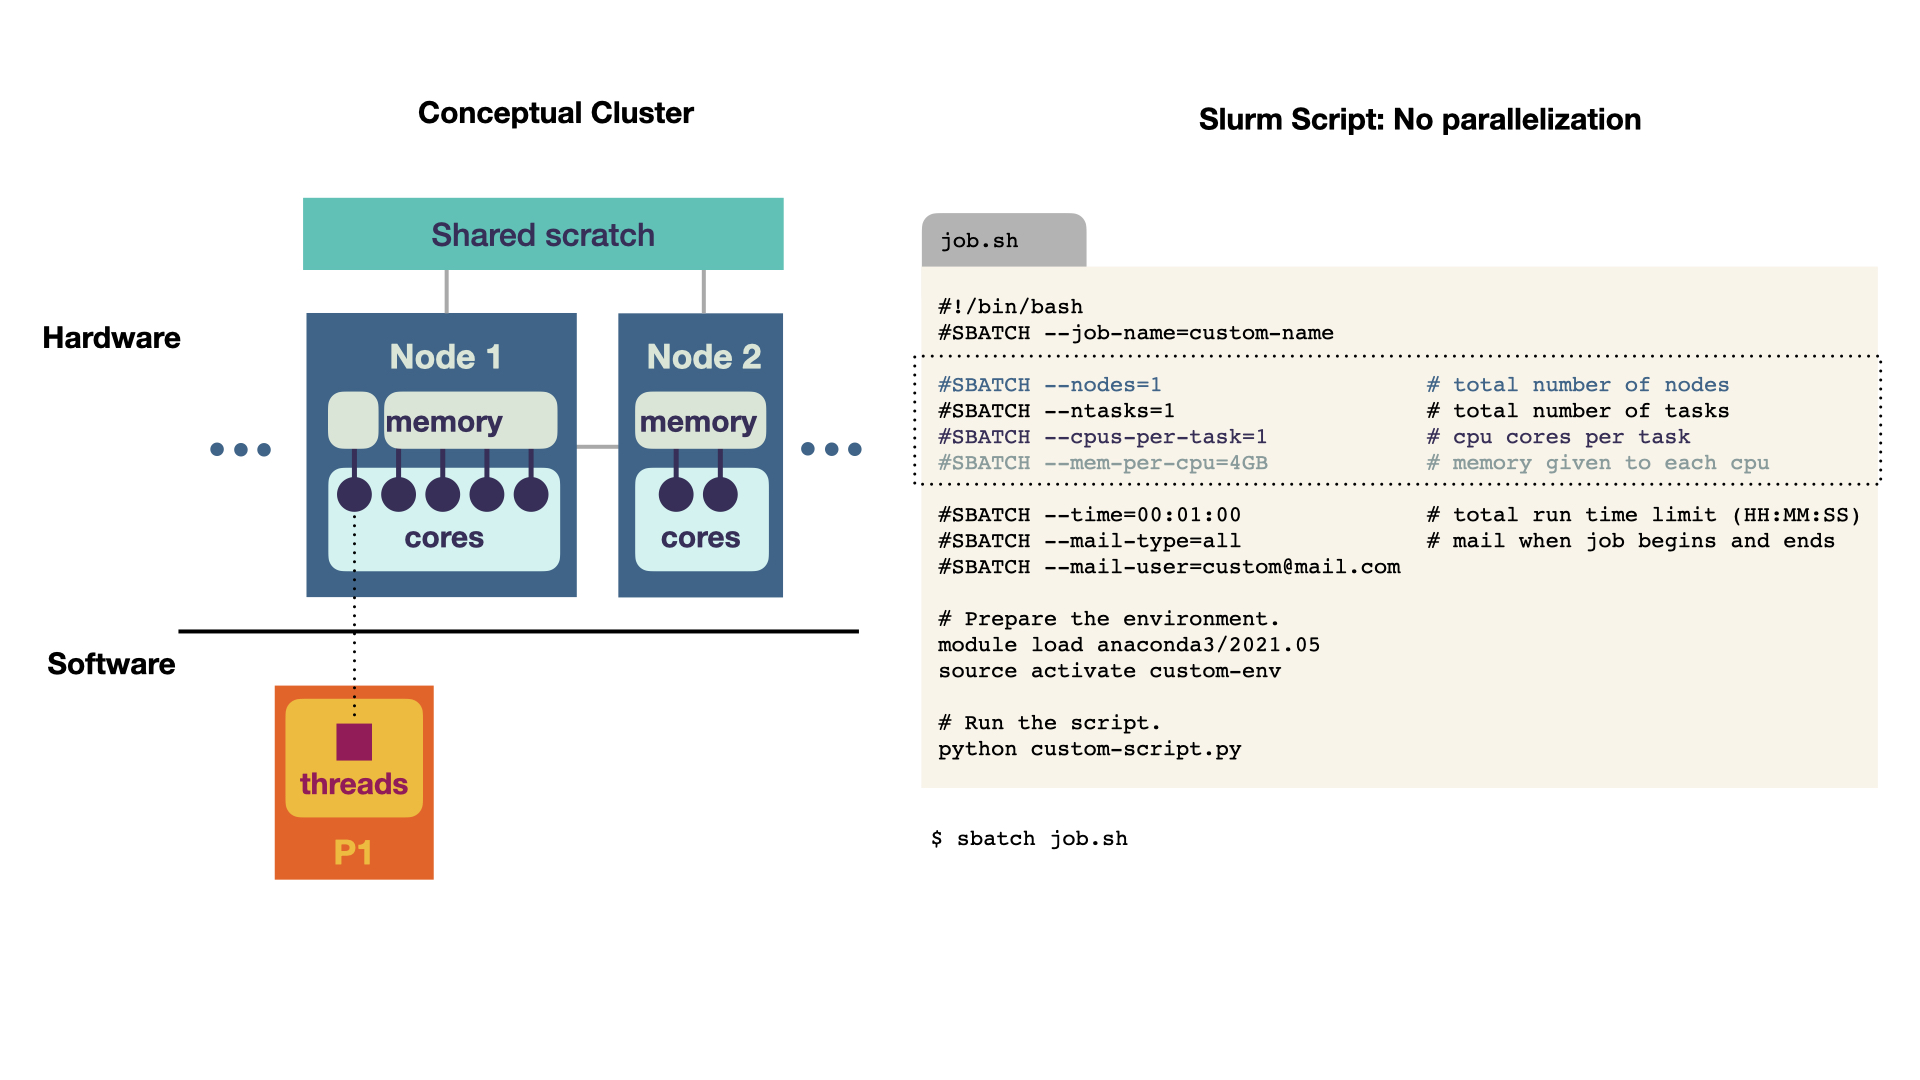
Single Program
The simplest case is to run a script without multithreading nor multiprocessing. Thus, we have 1 process and 1 thread. This directly translates to the Slurm script. 1. At the top, we request 1 node, for 1 task (1 code execution) and 1 CPU per task (so 1 core). Could you speed up your calculation by requesting multiple cores? No, these resources would increase the waiting time, but not improve the actual execution time, because the script cannot make use of the additional resources. The script ideas are taken from Princeton Computing and can be found as text in the appendix.
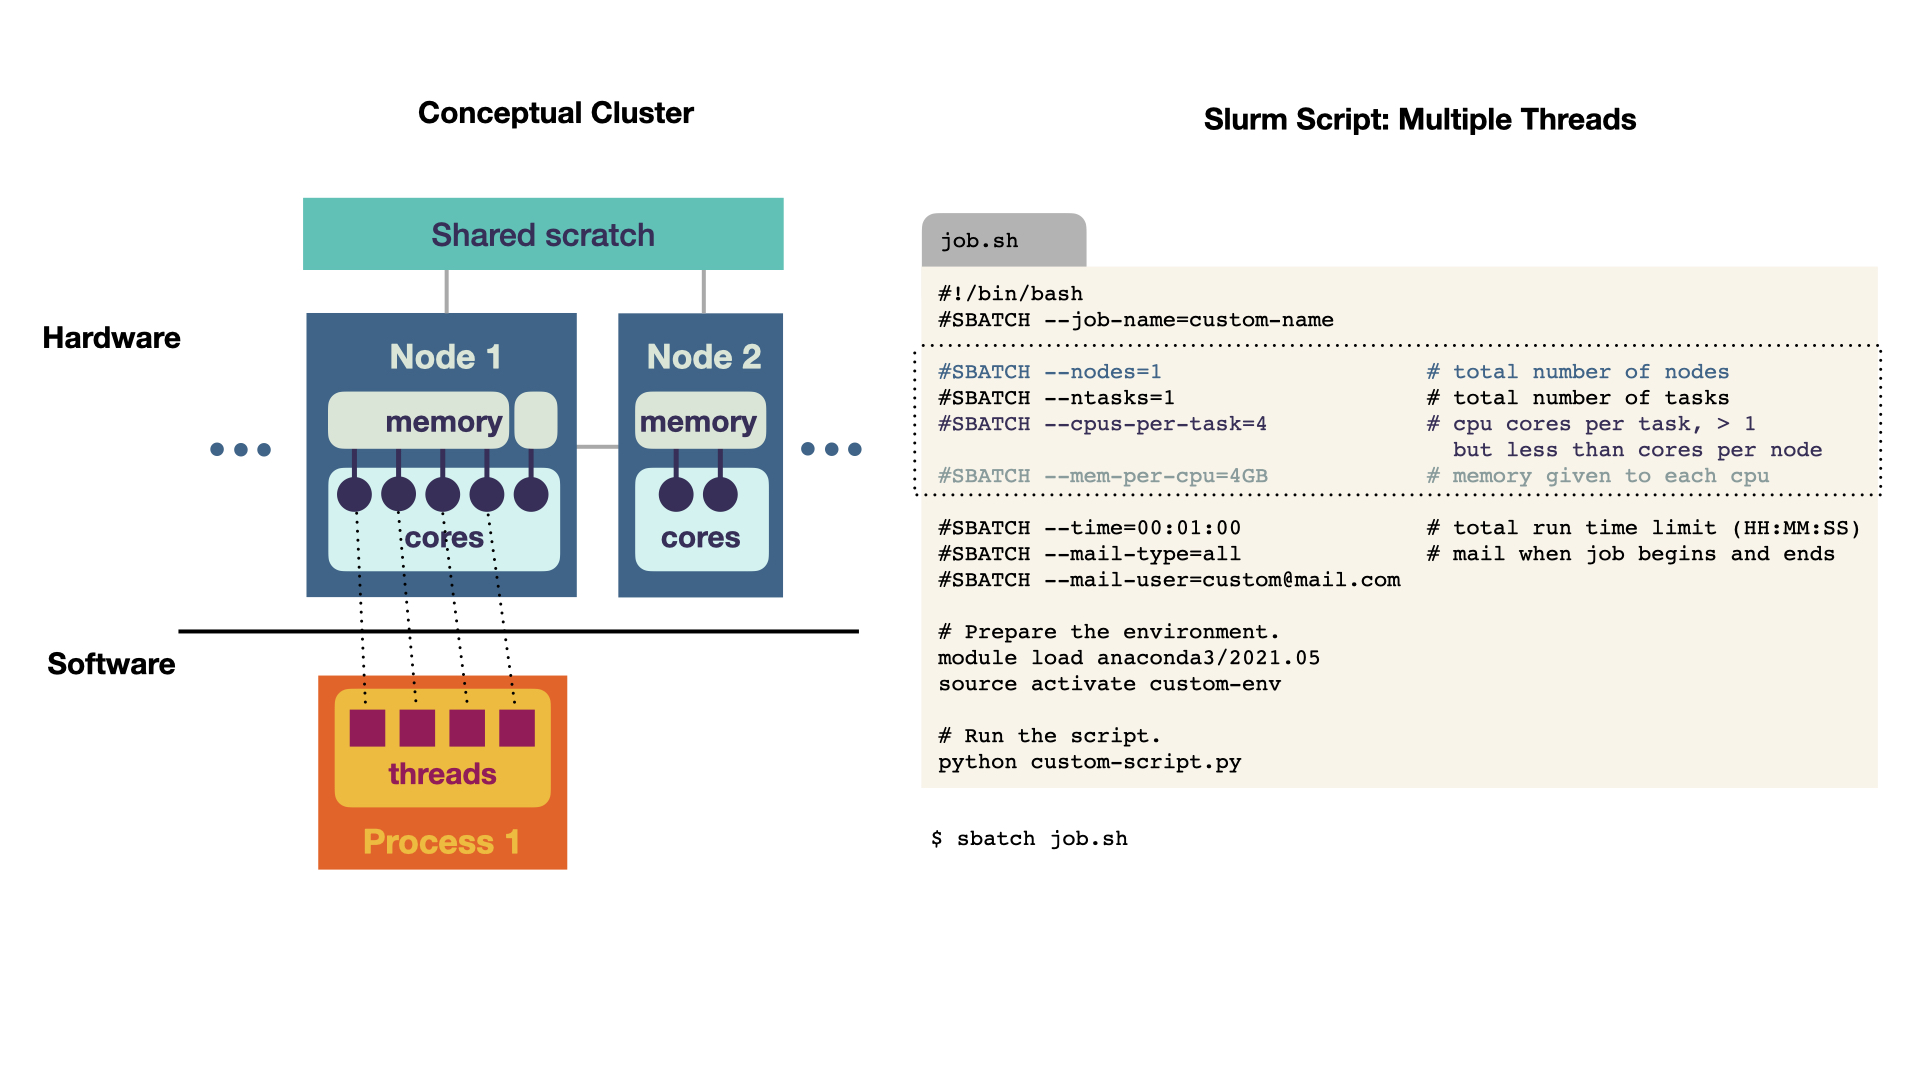
Multithreading
A multithreaded program runs on 1 node. The memory is shared for multiple cores, which is reflected in requesting 4 cores (4 CPUs).
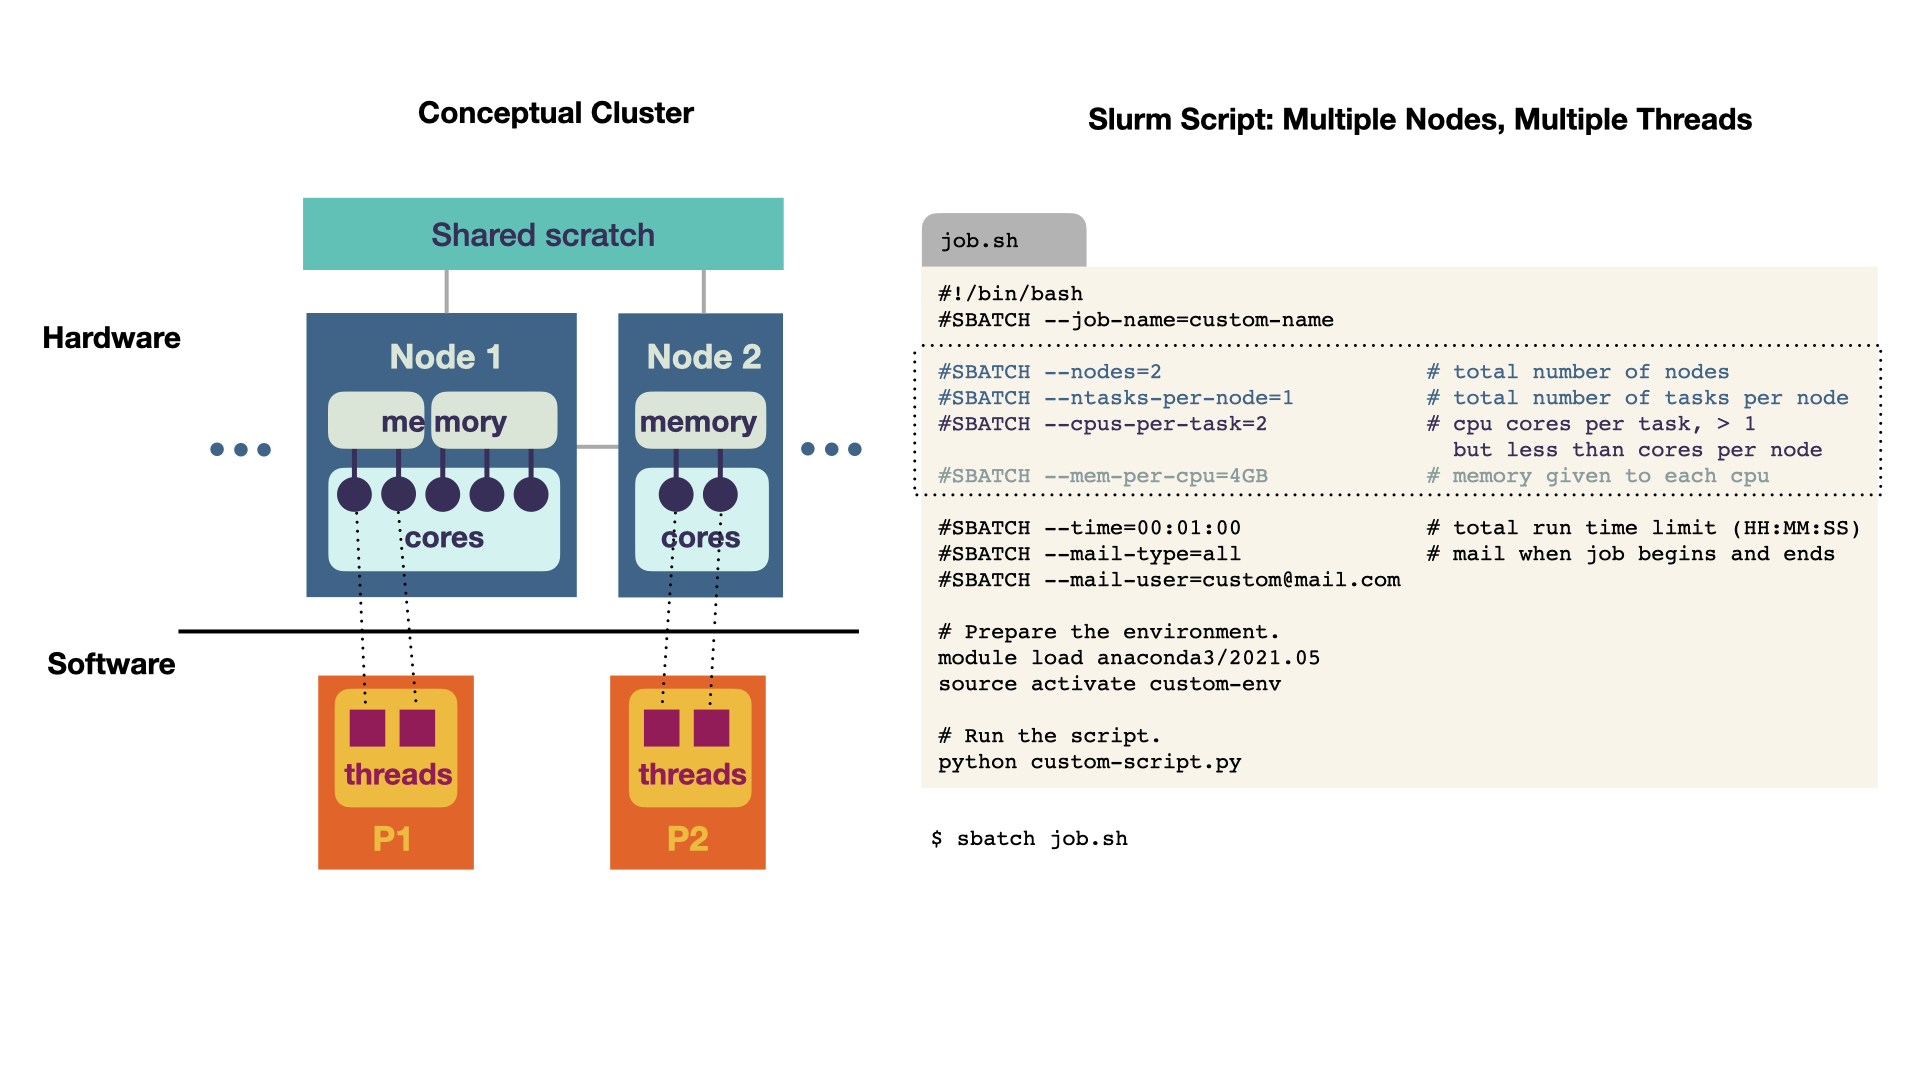
Multiprocessing
For multiprocessing, multiple nodes are requested. In this example, we request 2 nodes with 2 CPU cores. Optimally, we would try to fit the processes onto one node, because the communication would be faster than between nodes. However, this example illustrates that you can also do computations across nodes.
Things not covered
There are some things that we will not cover in detail.
- What if you would like to run a job n times with different seeds? It is possible to do so via using a
job array. In principle, the requested resources are requested n times. - Using
srun, it is possible to use Slurm in an interactive node (piping the output to the Shell). This can be useful for debugging, but the job will terminate once you close the shell. - You can provide on which partition (i.e., on which part of the cluster) the code should be executed. Note that some labs also have their own partitions.
- If you are not sure what to request (e.g., in terms of RAM) – the easiest answer is: try. After your job has finished, you can see the details of it with
sacct -j {jobid}by providing relevant fields (for list of fields, see –helpformat).
TAKEAWAY: Map the hardware requirements to the Slurm script. In case of doubt, guess, asses the usage and adapt.
Cluster-Connections
Having explored the nodes, we now add some more details about the connections in the cluster. Knowing about which connection type to use might speed up your calculations. The workflow remains as described in the first section, you log into the frontend (left) and send the job to the Slurm controller (bottom center), which then executes your script on some nodes (center).
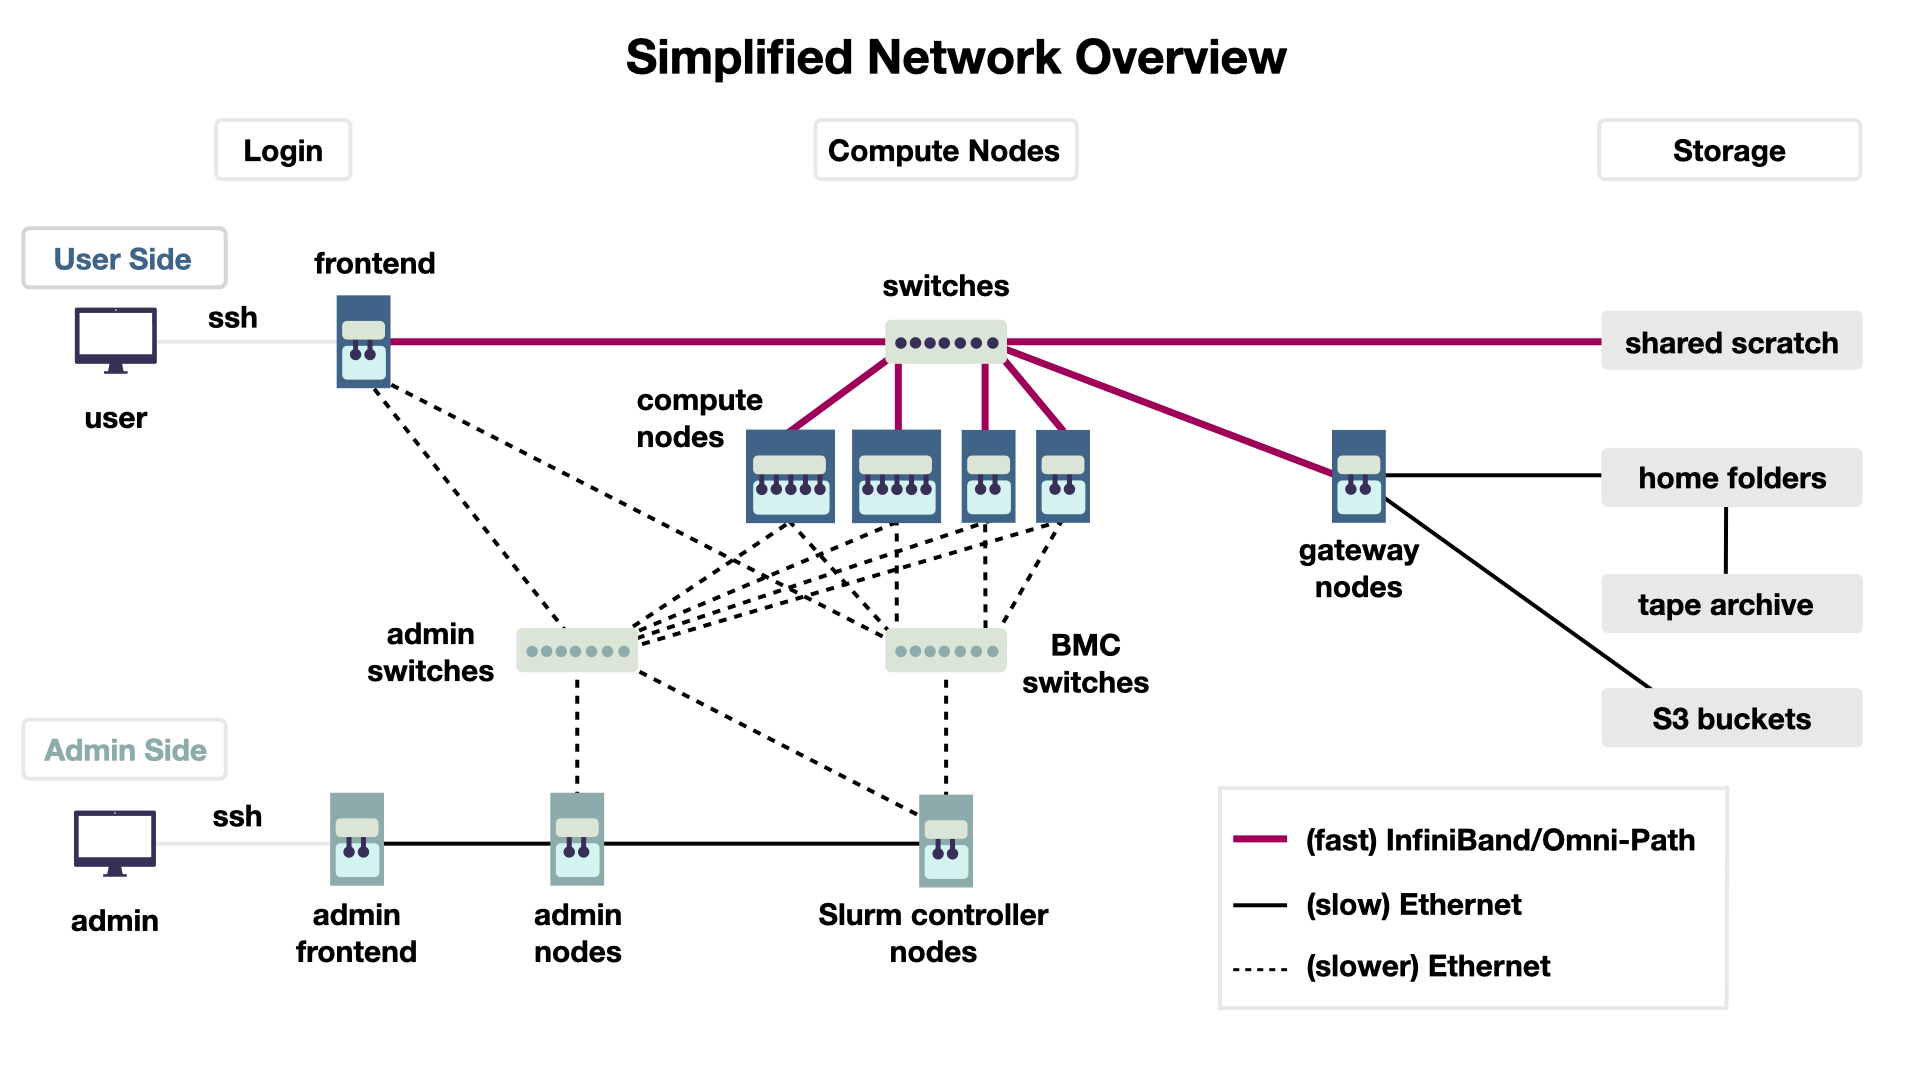
Connection Speed
The connection speed depends on the hardware used between the components. In Figure 6, it is indicated by color (red and bold means faster). The connection can be either Ethernet (black) or a very fast connection with InfiniBand/Omni-Path hardware (red). There are some practical takeaways: The nodes are connected with InfiniBand/Omni-Path, so if you can select a communication channel in your programme, use this fact. You can use ifconfig to see the exact network endpoints you can use. (Of course the fastest connection is within a node). Secondly, if you need to access files in a computation that are stored on the hard disk, put them in the shared filesystem (shared scratch, top right). This filesystem has a fast connection to the nodes, in contrast to the home folders of each user (center right).
Storage
Using the shared scratch for your computation results is great, for long-term storage it is not. This file system has no backup! Your home folder has a backup. This is indicated by the the connection to the tape archive (right center). These are literal tapes that are, after being written, stored as physical components not connected to any electricity. Lastly, it is also possible to connect S3 buckets to the whole cluster (bottom right).
TAKEAWAY: Use the fastest connection. Think about speed and backups.
Using Environment Variables in Slurm
Lastly, we illustrate where important environment variables point to. Environment variables describe where things are stored, such as the location of your Python installation or specific dependencies of your programme.
Why is this important to know when computing? Well, sometimes things go wrong, such as a programme not finding dependencies. It is nice to have a rough overview what environment variables are written and where important ones point to. More importantly, the following variables can also be used in the code for practical purposes (such as saving a file with your Slurm job name and a Slurm job id). Let us inspect the following Slurm submission script by paragraph, you can follow along interactively.
#!/bin/bash
#SBATCH --job-name=testing-variables
#SBATCH -p medium
#SBATCH -t 02:00
#SBATCH -o job-%x-%j.out # will be saved as job-{name}-{jobid}.out
#SBATCH -e job-%x-%j.err # will be saved as job-{name}-{jobid}.err

# 1. Variables for job description.
printf "\n\nVariables set by Slurm\n"
echo "User: ${USER}"
echo "Slurm job ID: ${SLURM_JOB_ID}"
echo "Name of this job script: ${SLURM_JOB_NAME}"
echo "Submitting job with sbatch from directory: ${SLURM_SUBMIT_DIR}"
# echo "Array task ID: ${SLURM_ARRAY_JOB_ID}"
# echo "Array task ID: ${SLURM_ARRAY_TASK_ID}"

# 2. Saving (temporary) files.
printf "\n\nThe following directories are available for saving files\n"
echo "Local address of the node for temporary files: ${TMP_LOCAL}"
echo "Local Address on scratch for temporary files: ${TMP_SCRATCH}"
echo "Home directory: ${HOME}"
echo "Working directory: $PWD"
- Setting the script output Standard output and standard error can be set in the #SBATCH section with
-o(output) and-e(error). They refer to the output of the Slurm script. The job name is denoted by%xand Slurm job id by%j. - Using environment variables Some environment variables are already set by us; for instance, the job id (
$SLURM_JOB_ID) and job name ($SLURM_JOB_NAME). These variables can be used in your script (useenvto get a complete list). You can also define your own environment variables, but avoid overwriting the ones already set as this can break stuff.
TAKEAWAY: Make use of environment variables set by your friendly admins.
Now let us dive a little deeper what happens when you set environment variables via loading packages or need to debug. (This is not needed for a quick start.)
# (continued)
# 3. Package manager conda example (for Python) on what is done with loading packages.
printf "\n\nHow to explore modules in depth (example)\n"
module spider anaconda3 2>&1 # which anaconda3 versions are available (to standard out)
module show anaconda3 2>&1 # which path are modified by loading anaconda3 (to standard out)
module load anaconda3 # loading module
conda env list # your personal conda directories

# Direct meddling with environment packages.
printf "\n\nSetting environment variables directly\n"
export EXAMPLE_DIR="example-value" # to manually set environment variables (no output)
echo "Set an environment variable to $EXAMPLE_DIR"
# printenv # to see all current environment variables

# 4. For debugging purposes.
printf "\n\nExample of debugging path in program."
strace -f -e open python example.py # Get system calls on what is opened, here with (non-existent) example.py, print to std err
-
Loading packages Software needs packages or specific paths to be set. As there are many users on a cluster and all have different needs (e.g., different versions of a programme, different environment variables they want to set), there is a
modulesystem that dynamically handles the loading. You can inspect which packages are available (withmodule spider anaconda3). If you are interested, which variables are modifiedmodule show anaconda3. Usually, you just load the module(s) you need and execute your script. However, you can also explicitly modify environment variables withexport. -
Debugging Sometimes, things go wrong. For instance, you install and execute a programme written by someone else; this programme has a
configfile and you are not able to find its location. The commandstracetracks system calls, so you can inspect files that are opened by a specific programme even without looking at the code! This command is also be helpful to see where temporary files are used. When necessary, you can also dive deeper.
TAKEAWAY: For debugging environment variables of a programme, you can use
strace.
Wrap-Up
Hopefully, having clear concepts about the job submission worfklow and hardware concepts facilitates setting up your workflow and following further documentation. Lastly, have fun computing and don’t be afraid to break things.
Thanks
Thanks to Sebastian Krey and Timon Vogt for teaching me a thing or two about the scientific compute cluster and for proofreading this article.
References
Appendix
For copying-and-pasting scripts, save the respective code under test.sh and submit it in the corresponding directory with sbatch ./test.sh.
Slurm script for requesting resources: no parallelization, 1 core
#!/bin/bash
#SBATCH --job-name=custom-name

#SBATCH --nodes=1                    # total number of nodes
#SBATCH --ntasks=1                   # total number of tasks
#SBATCH --cpus-per-task=1            # cpu cores per task
#SBATCH --mem-per-cpu=4GB            # memory given to each cpu

#SBATCH --time=00:01:00              # total run time limit (HH:MM:SS)
#SBATCH --mail-type=begin            # send mail when job begins
#SBATCH --mail-type=end              # send mail when job ends
#SBATCH --mail-user=custom@mail.com

# Prepare the environment.
module load anaconda3/2021.05
source activate custom-env

# Run the script.
python custom-script.py
Slurm script for requesting resources: multithreading
#!/bin/bash
#SBATCH --job-name=custom-name

#SBATCH --nodes=1                    # total number of nodes
#SBATCH --ntasks=1                   # total number of tasks
#SBATCH --cpus-per-task=4            # cpu cores per task, > 1 but less than cores per node
#SBATCH --mem-per-cpu=4GB            # memory given to each cpu

#SBATCH --time=00:01:00              # total run time limit (HH:MM:SS)
#SBATCH --mail-type=begin            # send mail when job begins
#SBATCH --mail-type=end              # send mail when job ends
#SBATCH --mail-user=custom@mail.com

# Prepare the environment.
module load anaconda3/2021.05
source activate custom-env

# Run the script.
python custom-script.py
Slurm script for requesting resources: multiple nodes, multiple threads
#!/bin/bash
#SBATCH --job-name=custom-name

#SBATCH --nodes=2                    # total number of nodes
#SBATCH --ntasks-per-node=1          # total number of tasks per node
#SBATCH --cpus-per-task=2            # cpu cores per task, > 1 but less than cores per node
#SBATCH --mem-per-cpu=4GB            # memory given to each cpu

#SBATCH --time=00:01:00              # total run time limit (HH:MM:SS)
#SBATCH --mail-type=begin            # send mail when job begins
#SBATCH --mail-type=end              # send mail when job ends
#SBATCH --mail-user=custom@mail.com

# Prepare the environment.
module load anaconda3/2021.05
source activate custom-env

# Run the script.
python custom-script.py
Slurm script for exploring different environment variables.
#!/bin/bash
#SBATCH --job-name=testing-variables
#SBATCH -p medium
#SBATCH -t 02:00
#SBATCH -o job-%x-%j.out # will be saved as job-{name}-{jobid}.out
#SBATCH -e job-%x-%j.err # will be saved as job-{name}-{jobid}.err

# 1. Variables for job description.
printf "\n\nVariables set by Slurm\n"
echo "User: ${USER}"
echo "Slurm job ID: ${SLURM_JOB_ID}"
echo "Name of this job script: ${SLURM_JOB_NAME}"
echo "Submitting job with sbatch from directory: ${SLURM_SUBMIT_DIR}"
# echo "Array task ID: ${SLURM_ARRAY_JOB_ID}"
# echo "Array task ID: ${SLURM_ARRAY_TASK_ID}"

# 2. Saving (temporary) files.
printf "\n\nThe following directories are available for saving files\n"
echo "Local address of the node for temporary files: ${TMP_LOCAL}"
echo "Local Address on scratch for temporary files: ${TMP_SCRATCH}"
echo "Home directory: ${HOME}"
echo "Working directory: $PWD"

# 3. Package manager conda example (for Python) on what is done with loading packages.
printf "\n\nHow to explore modules in depth (example)\n"
module spider anaconda3 2>&1 # which anaconda3 versions are available (to standard out)
module show anaconda3 2>&1 # which path are modified by loading anaconda3 (to standard out)
module load anaconda3 # loading module
conda env list # your personal conda directories

# Direct meddling with environment packages.
printf "\n\nSetting environment variables directly\n"
export EXAMPLE_DIR="example-value" # to manually set environment variables (no output)
echo "Set an environment variable to $EXAMPLE_DIR"
# printenv # to see all current environment variables

# 4. For debugging purposes.
printf "\n\nExample of debugging path in program."
strace -f -e open python example.py # Get system calls on what is opened, here with (non-existent) example.py, print to std err